
Once a year, in September, Maria Rodrigues makes enough fantastically delicious hot sauce to last her family a year.
It takes a lot of peppers.
“I get four bushels – the long red ones,” said Rodrigues, who’s been making the sauce since she was girl in the Azores.
Having heard big raves about this hot sauce from a friend on the Cape, I visited Rodrigues in East Falmouth last week to see how she makes it.
Using tarps on the ground in her backyard, laundry baskets, and enormous bowls, Rodrigues starts the three-day process by washing the banana-sized red peppers with the garden hose. As they dry in the sun, she starts gutting each pepper, one by one, wearing plastic gloves (“I learned my lesson about wearing gloves the hard way,” she said).
Once all the peppers are cleaned, she puts them through a Cuisinart meat grinder along with 10 large bulbs of garlic. She then mixes two pounds of kosher salt into the resultant mash, covers the bowls, and leaves them overnight.

The next day, Rodrigues divides one quart of extra virgin olive oil among her enormous bowls of pepper mash. Again she stirs and covers them and leaves them to sit for another night.
By day three, the mixture has begun to ferment.
As she spoons across the top of one of the bowls, little bubbles trail along the surface.
“See, it’s fermenting,” Rodrigues said.
By the end of Day Three, Rodrigues ladles her fiery sauce into assorted gallon and quart bottles. She then covers the surface of each container with a little salt and a bit more olive oil. Finally, she screws on their lids — lightly — and puts them in her extra refrigerator where they will keep beautifully until next year.

“You have to keep the tops loose for a few days so they don’t explode,” she said.
Explode?
“They keep fermenting for a few days,” she said.
My friend, Meg Fitzelle, from Woods Hole, who introduced me to Maria, says you have to keep the lids loose for at least a week.
“Last year, I kept noticing there was red everywhere in the refrigerator, it was like a Hawaiian volcano that keeps oozing out lava,” said Fitzelle. “You have to keep the lid loose in the beginning.”
When I asked Rodrigues why her simple sauce keeps without spoiling for a whole year, she didn’t know. She doesn’t even know the name of the pepper, but says that you can go to any of the Portuguese markets in Fall River or New Bedford this time of year and tell them you “want the peppers for the sauce.”
What she does know is that she’s been making and eating this sauce for more than 40 years, and it’s never made anyone sick.
“I don’t know what it is, we never had food poisoning. This is what I do and my sister does it the same way,” she said.
What does she eat it on?
Almost everything, and you can’t blame her, it’s so good. I’ve never much liked hot sauce, but this is delicious. I’ve eaten teaspoonfuls on chicken and scrambled eggs. The flavor is simple: it has the taste of sweet red peppers but the heat of hot ones and a texture similar to apple sauce. And unlike all the recipes I see for hot sauce, or the ingredient lists I read on brands, there’s no vinegar in Maria’s sauce, which is what I like most about it.
“You broil or fry fish and put not even a tablespoon on top,” she said. “We marinate meat with it too. Or, I’ll come home from work and fry an egg and in another pan fry garlic and the sauce in some oil and put it on top. My daughter eats it with butter on a round bread I make out of corn and wheat flour. We didn’t eat it that way growing up.”
When Rodrigues was a kid, her aunt didn’t even refrigerate the sauce. Instead, she covered the top of each bottle with a layer of olive oil, a layer of cheesecloth, and a layer of salt. These preserved bottles of hot sauce were stored in the dark and lasted throughout the year.
Rodrigues also preserves a small number of peppers whole. She fills the inside of the cleaned peppers with lots of salt, pours salt all over them, and piles them all in a ceramic crock topped with salt. The crock gets covered and stored in a dark place, and keeps all year. When she wants to use some, she rinses and soaks the peppers in water, slices them, fries them, and serves them to Carlos, her husband, over steak.
My jar of Maria’s Great Hot Sauce has not exploded in the fridge, but I’m keeping the lid lightly fastened, just to make sure.
]]>
 I bumped into Paul Trojano today. He lives in Norwell, has a place in Vermont, owns Caffe Graffiti in Boston’s North End, and loves to forage for food.
Look what he gave me.
They’re called Chicken of the Woods mushrooms. He picked them on Prospect Street in Hingham this morning. He also got oyster mushrooms there and black trumpets in West Chesterfield, N.H., on Saturday, the day before the hurricane (Irene).
Here’s his recipe for Wild Mushroom Risotto
8 oz fresh wild mushrooms such as Chicken of the Woods, Hen of the Woods, Chanterelles, Porcinis, Oysters or Black Trumpets
6 cups chicken or mushroom/vegetable stock
2 tbs. olive oil
1 1/2 tbs. butter
1 oz dry white wine to deglaze
1 medium onion, finely diced
1 1/2 cups arborio, carnaroli or vialone nano rice
S & P to taste
Finish: 2 Tbs. butter, 1/2 cup Parmigiano Reggiano, grated, white truffle oil (optional)
Slice or chop mushrooms depending on size and style of mushroom. Heat oil and butter and slowly saute mushrooms (Wild mushrooms must be cooked for at least 15 minutes), remove from heat and keep warm. Heat stock to a simmer. Heat oil and butter in a large pan and softly fry onion until translucent. Add rice and stir well. Add wine and stir. Slowly add hot stock a little at a time. Add more as the rice absorbs the liquid. This process should take about 20 minutes. Constantly stir to keep rice from sticking. About 15 minutes in, add sauteed mushrooms to rice and stock. The rice is done when it is soft on the outside, yet has a slight crunch at the center. At this point the dish should be creamy and fragrant. Remove from heat, finish by adding butter and cheese. Serve at once.
Serves four.
]]>

Wondering what would be special for holiday eats, I called one of my favorite chefs, Kevin Long, to see what he was doing.

I was at the market the other day and noticed two different women asking the butcher how to make a turkey. Which is funny since most of us make them every year yet somehow forget what to do. I used to be that way, but not anymore.
Here’s a tried and true recipe that results in succulent, seasoned dark meat, moist aromatic white meat, and crispy skin. I’m not a spectacular cook, but this is a spectacular turkey and I’d put it up against anything Martha Stewart could pull out of her oven.
I got the recipe from one of the best cooks I know –- my Uncle Luigi [left], who knows a thing or two about poultry, having killed, plucked, and roasted his first chicken behind my grandparents’ Italian grocery store in Danbury, Conn., when he was eight.
I enjoy this turkey twice a year: at Uncle Luigi’s for Thanksgiving, and when I make it at home for Christmas.
The recipe requires a bit of work the day before you cook it – as well as an hour or so just before putting it in the oven – for stuffing, trussing, and buttering up the bird. Making the stuffing of your choice will take more time.
But the beauty of this method, aside from the taste, is that it requires no work at all once it’s in the oven. (Which gives you tons more time to kill yourself cooking other things – or to enjoy the day!)
A number of factors make this recipe work so beautifully. Salting the bird seasons the meat and helps keep it moist (and is much easier than brining). Water in the roasting pan, the loosely placed foil cover over the turkey, and the low oven temperature combine to create a self-basting environment. And, lastly, removing the cover near the end of the cooking time crisps the skin.
Uncle Luigi’s Turkey Recipe
Very important shopping note: Do not sail into a market and buy a frozen turkey the day before Thanksgiving. They take three to four days to thaw in the refrigerator. Almost all markets have fresh birds, so buy one of those or, if using a frozen bird, which is perfectly fine, be sure to give it plenty of time to defrost.
What you need
A 20-pound turkey, although any size turkey will work; just adjust the other ingredients.
1 cup salt
3/4 stick unsalted butter at room temperature
1/2 cup vegetable oil
A large roasting pan
A large V- or U-shaped rack to hold turkey inside pan
Cooking string
Extra wide aluminum foil
A simple meat thermometer if you’re inexperienced at determining when the turkey is done.
Wednesday:
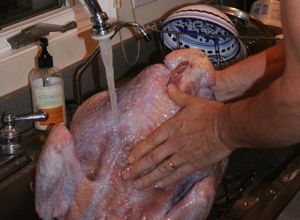
1. Remove any giblets and wash the bird in the sink with running water, inside and out.
 2. Rub 3/4 cup of granulated (regular grind) salt all over the bird, and spread another ¼ cup as evenly as you can inside it.
3. Set the salted bird in the refrigerator for three hours.
4. Rinse the bird in the sink, for five to 10 minutes. Just keep rinsing it, inside and out. Rinse, rinse, rinse. [at right]
5. Dry it with a clean cloth.
6. Prop it in the roasting pan “sitting up,” somehow, so liquid can drain out the center cavity (I set it on the V-shaped rack I later use to roast it) and refrigerate until cooking time, letting it dry. (Luigi hangs his in his cold shed, but I don’t.)
Thanksgiving day:
7. Stuff the turkey with your choice of stuffing and truss – this is a simple way to tie the bird so it cooks more evenly.
8. Preheat oven to 335 degrees.
9. Rub the vegetable oil all over the bird.
10. Rub the butter all over it, too.
11. Place the bird on its back on the V-shaped rack.
12. Pour 1 cup of water in the roasting pan. DO NOT FORGET THIS.
13. Fashion an extra-large sheet of aluminum foil (or two sheets crimped together to make a wide expanse) into a dome and place it lightly over the turkey, without tucking it in.
14. Place bird in oven, and cook 15-18 minutes per pound. (A 20-pound turkey should cook somewhere between five and six hours. This recipe is for a stuffed turkey; if you don’t use stuffing, research cooking times, which will be shorter.)
15. Two-thirds of the way into the average total cooking time, open the oven as quickly as possible and pull off the foil.
16. When the shorter estimated cooking time is up, test for doneness. A thermometer should read at least 165 degrees when inserted deep in the thigh. (The temperature will continue to rise as the turkey rests.)
17. Remove turkey from oven and let it rest for 30 minutes before carving.
18. Smile and give thanks when everyone raves about how delicious the turkey is!
 It’s late October and I’m sitting in Drago’s Seafood Restaurant and Oyster Bar in New Orleans on the first night of a five-day family reunion at my brother- and sister-in-law’s house in the French Quarter.
Having relatives in great places is sweet and this is my sixth or seventh trip to the city. And, because the house is vast with room for all and my father-in-law such a good cook, we tend to stay in for dinner.
But Drago’s is a family favorite and we have to eat here. This is where the now popular New Orleans charbroiled oyster originated in the early ‘90s, which is pretty much all we order: platters and platters of the buttery, garlicky, grilled bivalves.
“We’ll have another dozen,” says my husband’s brother, Jamie, to our server.
Chances are, even if you don’t like oysters, you’d like these. They taste like the world’s best garlic bread with a little something more. If you were blindfolded, I don’t think you’d know they were oysters, yet die-hard oyster lovers adore them.
We have so many great oysters on the South Shore, but I’ve never had or seen them grilled the way owner Tommy Cvitanovich does it at Drago’s.
The restaurant was founded in 1969 in Metairie, a suburb of New Orleans, by Tommy’s parents, Drago and “Miss Klara” Cvitanovich, who are still very much a part of its operations. Some 38 years later, in 2007, the family opened a second Drago’s on the Mississippi River, steps from the Quarter. The 360-seat restaurant is inside the Hilton, which was totally renovated after Hurricane Katrina, or the storm, as locals call it.
 As soon as you walk into either Drago’s you see dozens of oysters on the half shell on an enormous grill. Chefs literally throw handfuls of a Parmesan, Romano, and parsley topping over the butter-sauce-filled oysters, causing the fire to flare up and char them.
Tommy came up with the idea of grilling oysters in the shell one bright day at the restaurant in the early ‘90s, after sending out an order of redfish, covered in garlic, butter, and herbs.
“We cooked the redfish with skin and scales that acted like a shell or extra plate that held the juices and basting in,” said Tommy. “I thought ‘there’s no better liquid than oyster juice,’ and put two and two together and won the lottery. It’s one of the coolest things, they’re on a lot of menus in town now. I pinch myself.”
In 2009, Drago’s sold more than 3 million oysters, a dozen at a time.
“We knew it was special right away, but there was a high learning curve for mass-producing them,” said Tommy.
Drago’s is still getting all its oysters from the Gulf and Tommy wants people to know that endless tests have found all the seafood leaving those waters to be free of hydrocarbons and oil. This echoes the findings of a report released from the National Oceanic and Atmospheric Administration and the Food & Drug Administration last week.
Which isn’t to say everything’s good in the Gulf since the BP oil spill. According to Tommy, a large percentage of the oyster beds in the Mississippi Delta region are dead now, due to the influx of fresh water that was diverted into the Gulf to keep oil off the coast.
Tommy was very interested when I told him about Island Creek Oyster’s farming operation in Duxbury. He’s familiar with the general area because he buys some of his lobsters in Bourne.
Five weeks after Katrina, when Jamie and Mary finally returned home to New Orleans, I kept asking them if this place or that place had reopened. It was the only way I could try to gauge the devastation. Hardly any place was open, and those that were, were mostly giving away what food they had.
And Drago’s was first among them.
“I was in Baton Rouge and came back … a few days after the storm hit… but Freddie McKnight our manager stayed in the restaurant during and after the storm,” said Tommy. “We were serving first responders and employees who lived in our neighborhood the day after Katrina.”
In the eight weeks after the storm, Drago’s gave away almost 80,000 free meals, while busily repairing the restaurant. For this generosity, the Washington D.C.-based National Restaurant Association honored Drago’s with its Restaurant Neighbor Award – the first to be given to a restaurant in New Orleans.
In the five years since Katrina, it seems that Drago’s business has about doubled, what with the new restaurant. They don’t take reservations at either location and we waited an hour in the warm night to get our table for 12 (we are 15 in all, but some of us hadn’t arrived yet).
A good thing is a good thing and it’s good to see a family make good – whether that family is mine, the Cvitanovich’s, or the family of people that is the city of New Orleans.
Lisette Dell’Apa’s Drago-inspired grilled oysters
Drago’s recipe is different from the one my sister-in-law (in Pennsylvania) has struck upon after trying many methods for replicating Drago’s oysters. I suspect that’s because Drago’s has a much hotter grill than a home gas grill. Tommy Cvitanovich told me that his butter sauce is a combo of butter and margarine, chopped garlic, Italian seasoning, and black pepper. His cheese is a mixture of half Romano and half Parmesan with some chopped parsley. Drago’s puts the butter sauce on the oysters before they’re set on the grill, then throws the cheese over them. Lisette finds that they burn if she does it that way and has settled on the following recipe.
This is for a dozen oysters: double, triple, or quadruple it for more!
The sauce:
1 stick melted unsalted butter
1 pinch kosher salt
1 teaspoon freshly ground black pepper
1 tablespoon minced garlic
1 pinch cayenne pepper
1 pinch white pepper
1 teaspoon lemon juice
1 teaspoon minced Italian parsley
Blend everything together.
Cheese mixture:
1 1/4 cups grated Romano and Pecorino cheeses, mixed
1/3 cup breadcrumbs
Mix cheese and crumbs together
1. Shuck a dozen oysters
2. Heat a charcoal or gas grill until very, very hot.
3. Place oysters on the hottest part of the grill and let them cook in their own juices for three to four minutes or until they start to bubble and the edges ruffle.
4. Top each with a generous portion of the cheese topping (enough to fill the shell).
5. Sprits with water a few times to get the flames to jump
6. When the topping starts to bubble and brown, which could be as long as five to seven minutes from the time you started cooking them, ladle a little butter sauce on each oyster (using a long ladle and gloves).
7. Cook for another minute or so.
8. Transfer oysters to a serving platter, drizzle with more butter sauce, and serve with hunks of crusty bread, lemon wedges, and hot sauce.
Once a year, in September, Maria Rodrigues makes enough fantastically delicious hot sauce to last her family a year.
It takes a lot of peppers.
“I get four bushels – the long red ones,” said Rodrigues, who’s been making the sauce since she was girl in the Azores.
Having heard big raves about this hot sauce from a friend on the Cape, I visited Rodrigues in East Falmouth last week to see how she makes it.
Using tarps on the ground in her backyard, laundry baskets, and enormous bowls, Rodrigues starts the three-day process by washing the banana-sized red peppers with the garden hose. As they dry in the sun, she starts gutting each pepper, one by one, wearing plastic gloves (“I learned my lesson about wearing gloves the hard way,” she said).
Once all the peppers are cleaned, she puts them through a Cuisinart meat grinder along with 10 large bulbs of garlic. She then mixes two pounds of kosher salt into the resultant mash, covers the bowls, and leaves them overnight.
The next day, Rodrigues divides one quart of extra virgin olive oil among her enormous bowls of pepper mash. Again she stirs and covers them and leaves them to sit for another night.
By day three, the mixture has begun to ferment.
As she spoons across the top of one of the bowls, little bubbles trail along the surface.
“See, it’s fermenting,” Rodrigues said.
By the end of Day Three, Rodrigues ladles her fiery sauce into assorted gallon and quart bottles. She then covers the surface of each container with a little salt and a bit more olive oil. Finally, she screws on their lids — lightly — and puts them in her extra refrigerator where they will keep beautifully until next year.
“You have to keep the tops loose for a few days so they don’t explode,” she said.
Explode?
“They keep fermenting for a few days,” she said.
My friend, Meg Fitzelle, from Woods Hole, who introduced me to Maria, says you have to keep the lids loose for at least a week.
“Last year, I kept noticing there was red everywhere in the refrigerator, it was like a Hawaiian volcano that keeps oozing out lava,” said Fitzelle. “You have to keep the lid loose in the beginning.”
When I asked Rodrigues why her simple sauce keeps without spoiling for a whole year, she didn’t know. She doesn’t even know the name of the pepper, but says that you can go to any of the Portuguese markets in Fall River or New Bedford this time of year and tell them you “want the peppers for the sauce.”
What she does know is that she’s been making and eating this sauce for more than 40 years, and it’s never made anyone sick.
“I don’t know what it is, we never had food poisoning. This is what I do and my sister does it the same way,” she said.
What does she eat it on?
Almost everything, and you can’t blame her, it’s so good. I’ve never much liked hot sauce, but this is delicious. I’ve eaten teaspoonfuls on chicken and scrambled eggs. The flavor is simple: it has the taste of sweet red peppers but the heat of hot ones and a texture similar to apple sauce. And unlike all the recipes I see for hot sauce, or the ingredient lists I read on brands, there’s no vinegar in Maria’s sauce, which is what I like most about it.
“You broil or fry fish and put not even a tablespoon on top,” she said. “We marinate meat with it too. Or, I’ll come home from work and fry an egg and in another pan fry garlic and the sauce in some oil and put it on top. My daughter eats it with butter on a round bread I make out of corn and wheat flour. We didn’t eat it that way growing up.”
When Rodrigues was a kid, her aunt didn’t even refrigerate the sauce. Instead, she covered the top of each bottle with a layer of olive oil, a layer of cheesecloth, and a layer of salt. These preserved bottles of hot sauce were stored in the dark and lasted throughout the year.
Rodrigues also preserves a small number of peppers whole. She fills the inside of the cleaned peppers with lots of salt, pours salt all over them, and piles them all in a ceramic crock topped with salt. The crock gets covered and stored in a dark place, and keeps all year. When she wants to use some, she rinses and soaks the peppers in water, slices them, fries them, and serves them to Carlos, her husband, over steak.
My jar of Maria’s Great Hot Sauce has not exploded in the fridge, but I’m keeping the lid lightly fastened, just to make sure.
]]>
Expecting there would be no problem getting a table, we showed up at 7 p.m. on a recent Friday night and were lucky to get seated at the bar. Reservations, it turns out, are a good idea at Oro, especially on weekends. The Kings have exempted the bar seats and four small tables in the lounge from reservations, giving last-minute diners a good chance to join the party.
Oro is extremely pretty with a spare, Asian look — all bamboo, beige, and straw with Japanese shoji-style sliders, a high ceiling, orange and green accents, multiple-paned windows up high, and one enormous flat-screen television above the bar. With the help of designer Susan Orpin, the Kings totally renovated the former Flounder Inn — an odd place in the old Walsh building that served breakfast and Chinese food for years.
My initial reaction to the TV was dismay that we’ve gotten to the point where we can’t be without immediate access to electronic media. Two nights later, on a second visit to the restaurant, I was glued to the thing for the last few minutes of a Boston Celtics playoff game. Robin King, who serves as Oro’s chef, later told me he hadn’t wanted a television, but had seen people walk out of places when they didn’t find one.
On both visits, the crowd was a mixed bag of ages, from twentysomethings on up, and the whole place buzzed with a sophisticated yet casual feel.
Oro has a high staff-to-customer ratio, making for great service. I counted six cooks in the kitchen on my Sunday evening visit, plus King working as expediter front and center in the large open window to the kitchen.
The corn chowder ($10) was a thick soup with bits of clam and bacon — its sweet creaminess based on a puree of corn as well as dairy. A special appetizer, the pan-fried soft-shelled crab ($12) was served beneath an outstanding chunky avocado salad with mint, corn, and cilantro.
Among the other offerings on Oro’s Beginnings menu are two salads: a simple, good Caesar ($8) and a radicchio endive ($9), a slaw almost, with toasted pecans and Gorgonzola. I liked it and would have loved it if the honey thyme vinaigrette had more punch.
The pork osso bucco ($21), accompanied by whipped potatoes and tiny crispy onion strings, fell off the bone at the touch of a fork. The orecchiette pasta with veal and tomato ragout ($18) had a lovely sweet sausage flavor. And I loved the side dish of roasted cauliflower ($6), which was deliciously caramelized.
The pan-roasted swordfish ($24) was perfectly cooked — moist but not rare — and topped with a chunky olive tapenade. It was served over a tomato coulis and a very good, bright-yellow saffron risotto.
The flavorful crispy chicken ($20) was smeared with a minty chimichurri sauce and served over a wilted watercress salad with truffle oil (good) and braised artichokes.
Most of Oro’s desserts resemble abstract art: the guy next to us had a gorgeous cheesecake with rhubarb compote that looked like a model of a raspberry-colored UFO. One of us adored the wedge of shortbread cake that came with the lemon thyme crème brulee ($6) and found it reminiscent of a torta della nonna (grandmother’s cake) we’ve had in Italy.
The good pineapple cake ($6) was set on one end of a large, rectangular white plate with a scoop of ice cream on the other end, both of which were encircled by an oval of caramel sauce and other little goodies scattered around.
We ended our second evening at Oro with a chocolate-chip ice cream sandwich ($6) that seemed boringly out of place among the other great desserts.
Hey, you get spoiled eating out. And Scituate has several great places. Oro is front and center with the best of them.
Oro; 162 Front St., Scituate; 339-526-1701; Hours: Friday and Saturday, 5 to 10:30 p.m.; other days 5 to 10 p.m.; closed Tuesdays; Accessible to the handicapped; Major charge cards accepted.
]]>
 I’ve been contemplating writing a cookbook with a title along the lines of “I’m too tired to cook, but why don’t you come over for something simple to eat, anyway,” which should indicate the direction my culinary energies have been headed lately.
So, you can imagine how near the bottom of my list the idea of baking was when I heard that Edible South Shore was holding a baking class last weekend with the magazine’s food editor, Paula Marcoux.
But, Marcoux is one of my heroes for having built her own wood-fired brick oven for about $30 in supplies. (See a previous column) So, even though I didn’t think I wanted to learn any more than I already know about baking bread, I couldn’t resist taking the class because I suspected that Marcoux, being a food historian, would have something special to impart. And she did.
I went to the class ringless, knowing I’d be kneading away, but we never kneaded.
Instead, I learned about a widespread movement in the bread-baking world to make wetter doughs than traditional kneaded doughs. Because the doughs are wetter, they are too sticky to knead, requiring that they be worked differently.
The aim of using less flour – of making wetter doughs — is to produce breads that are airy with big holes inside and have crisp crusts: the kinds of artisanal breads that are becoming more widespread at the marketplace from bakeries like Iggy’s Bread of the World.
“It’s been quite a decade for bread,” said Marcoux, who’s been researching wet dough bread baking since leaving her job as curator at Plimoth Plantation about 18 months ago. Her conversation is sprinkled with references from the work of famous bakers – Lionel Poilane, Raymond Calvel, the authors of obscure 17th century tomes.
And her teaching incorporates so many facts about the variables that affect bread production – enzyme action, steam, surface tension, minimal yeast, lengthy fermentation — that one begins to grasp the complex chemistries that result in the variety of great breads the world over.
Which, surprisingly, isn’t to say that bread baking is difficult or labor-intensive. It’s not, although you do have to know some basic principles and techniques. Nor is it very time-consuming, although it is best done over time – perfect as a background activity during a day at home (longer rising times make much better breads). Still, Marcoux packed a lot of information and baking into a three-hour workshop.
Participants each arrived with a bowl, a wooden spoon, and a tea towel. Marcoux arrived with a vat of yeasty sponge (a watery yeast and flour mixture that is the first stage of yeasted bread making); enough sourdough starter for each of the 10 of us: and a sweet dough ready for forming into cinnamon rolls.
Starting a wet dough is like starting a traditional kneaded dough except that much less flour is used.
Getting the right moisture (hydration) level is thus critical, so Marcoux, like serious bakers everywhere, highly recommends using a simple kitchen scale to weigh ingredients rather than measure them.
“A cup of flour can vary in weight, but four ounces of flour is always four ounces of flour,” she said.
The most essential know-how I got from the workshop was learning two basic techniques that replace kneading in wet doughs.
One is to use a spatula to pull up on the dough in a bowl from beneath it, stroke after stroke, while turning the bowl. Quite easy.
The second main method is to stretch and fold the dough.
A wet dough is a cohesive mass, quite like a traditional dough, but much less firm. The stretch and fold method allows a baker to work the dough (required for good gluten development) while adding as little additional flour to it as possible.
 The technique involves placing the dough on a floured board and sliding a dough scraper underneath it and using the tool to pull and stretch the dough out into a long mass. Once this is done, the tool is used to fold the dough in thirds like you would a letter, which results in a thick square with three layers that can be set aside to rise.
What I ultimately took away from the workshop was a renewed attraction to bread baking – drawn by the allure of fermented doughs as living, responsive, almost mystical things.
Seeing them through Marcoux’s eyes and experience inspired me out of my exhaustion. I spent the next day working with the sourdough starter I got from her and baking rolls and sweet rolls.
And they were delicious — better than any I could buy.
 I loved that the French style rolls I baked (above), from the dough we made in class, remained fresh for 48 hours and didn’t turn rock-hard like all the other French breads I buy.
And I loved the tangy sourdough boule Marcoux made in class (right) and the fact that it rises in a lined basket. And I love that wet doughs make a lighter bread that can remain lightish even when whole grains are added.
I’m considering a second in my series of cookbooks. It’s not set in stone yet, but the title might be something along the lines of “No-knead baking for somewhat lazy people who love great bread.”
Or, maybe it could just be a chapter in my other book. We’ll see.
Visit Edible South Shore’s blog to find some of Marcoux’s blog entries.
Photographs of dough and boule by Michael Hart; photo of rolls by Joan Wilder
]]>
 I can’t tell whether what I did last weekend was clever or ridiculous.
Inspired (obsessed?) by a recent revelatory and mouthwatering encounter cooking pizza in a friend’s wood-fired brick oven, I got to wondering if pizza could be cooked on a gas grill and come out better than what I can make on a pizza stone in my oven.
Hey, I know that gas grills have nothing of the raw, elemental appeal of a wood-fired brick oven. But I don’t have a brick oven, and I do have a gas grill.
So I went to the wizard — Zee In-tair-net — and read postings from several people who grill pizza on gas grills using a two-part method: They cook one side of the dough on the grill, remove it, and cover the cooked side with the topping. They then grill it again, raw side down.
But, I didn’t want to do it that way.
I wanted to grill a pizza, topping and all, in one maneuver to capture some of the magic that happens inside a brick oven.
Meanwhile, the conviction that I could do this was inflamed by what I’d recently learned about the principles of cooking, specifically, the conduction and radiation of heat, from Alton Brown’s great book, “I’m Just Here for the Food.”
So I understood that bricks in a brick oven absorb the heat the fire emits. They suck up such a tremendous amount of heat, in fact, that it can take hours for an oven to reach the desired temperature (usually around 700 degrees). But, once it reaches the target temperature, the stones act as heat sinks, holding and slowly radiating the heat — even though the front of a wood-fired brick oven is always open. Wouldn’t stones work well for holding a high temperature in a gas grill when the lid has to be lifted?
My first thought was to use a pizza stone in my Weber, but I figured that the stone would get so hot, that the pizza’s bottom would burn before the top could get cooked. I also realized that a single pizza stone wouldn’t be large enough to hold the heat once the lid was lifted.
 What I needed, clearly, was a little heat-absorbing, heat-radiating cave inside my grill.
Back to Google for a tenth search, where I found some real inspiration: a guy who did just what I wanted to do! And, although his grill was bigger and had a few key advantages, it was exciting to see how he’d packed it with firebricks and made a gorgeous pizza in just a few minutes. (Check it out here.)
Never mind that his grill has a burner in the rear that heats the box (thus allowing food to be grilled using the indirect method), his example was enough to keep me going. (Indirect grilling is grilling on a surface without flames directly beneath it.)
Again to the web, where I found that Quincy’s TLC Supply, a masonry yard, had firebricks in stock. The guys there were nice, explained that regular bricks and stone crack under high heat, and sold me 10 firebricks for $17.
At home, I assembled a small cave [at left] inside my Weber using firebricks and a pizza stone, and baked a couple 7-inch pizzas. The first was burnt to a crisp when I checked it at after three minutes. The second cooked pretty nicely in 90 seconds, but the oven was too small, so I assembled another.
For this one, I used a metal oven rack to support the top layer of bricks on the next cave [below].

Throughout, I kept notes on temperatures (600 degrees as registered on the Weber’s thermometer); the status of burners on and off; cooking times; and number of lid liftings. I also kept dough weight, size, and toppings the same on seven of the nine pizzas I made.
So, how’d it work?
I couldn’t get a spectacular or consistent result.
Most of the pies came out good [one of the more successful efforts shown here], better than I can make in my oven, but I couldn’t be sure the next one would be the same. And they tended to burn on the bottom before the top could get browned prettily. The best I could do was make a good pizza with a crust that was a tiny bit too tough on the very bottom to be great.
I think that if I had a large gas grill with burners arranged so one side could be turned off and one on (allowing for indirect grilling) I could nail a great pie. I’d build the brick cave on one side; bring the oven to its highest temperature; turn off the burners on the side under the brick cave; and cook the pizza in three to five minutes. (I’d also add a bit of wood to the fire to lend a smoky flavor.)
So.
 I still want a wood-fired brick oven, but don’t want to spend the $3,000, or more, that they cost.
Maybe, I can build one myself with help from edible South Shore Food Editor Paul Marcoux of Plymouth, who made hers for $30 in materials! After this past weekend, I can kind of conceive of it. And, until then, when I really want a pizza, I’ll probably pile the bricks in my Weber and make one.
(For a look at an insane brick oven a guy in California made out of a Weber kettle grill you will never forget, check this out.
And to see the mother of all wood-fired brick ovens, go to Bertucci’s on Derby Street in Hingham or Franklin Street in Braintree. Their ovens are gorgeous and enormous and you can watch pizzas bubble up and cook in minutes.)
]]> Have you ever looked into a wood-fired brick oven for three straight minutes and watched a flat, raw pizza puff up into a bubbling cooked one in seconds?
I just have for the first time, and it’s spectacular! The baking happens so fast, it feels like you’re seeing time-lapse photography instead of live cooking.
You’re watching, watching…and nothing for 20 seconds — it’s still flat.
Then, suddenly, Oh! The edges seem to be thickening, but are they?
Another 15 seconds and OMG, you’re sure: they’re definitely puffing up and then, wow! A couple bread bubbles appear on the edge nearest the burning wood, and in the next moment you realize that, actually, in fact, the whole crust has risen up! And that it’s begun to color and darken irregularly – that the cheese topping is rising and bubbling, too.
Then, after a few turns of the pie – so all edges get direct face-time with the fire — the flat raw dough has turned into a gorgeous pizza.
“It’s a living thing!” said Lisa Corrado [above] of Hingham, excited by my excitement and the fact that this is the first pizza of the season in the beautiful backyard oven her husband Frank, a master mason, built in 2005.
For a while now I’ve been hearing about how great wood-fired brick ovens are – for cooking, definitely, but maybe even more for their ability to create an instant party. Last weekend, I finally saw why.
Devotees say that anything that can be baked in a regular oven can be improved by cooking in a wood-burning oven. And I’ve heard, and tasted, enough to believe that’s true. Lisa (an illustrator by day, chef by night) made a casserole full of roasted potatoes with olive oil and rosemary and another of chicken wings that were both delicious.
But I think it’s the ovens’ near-magical prowess at baking pizza and other bread-based goodies that draws crowds like karaoke used to do.
It’s just so much fun to assemble pizzas with different toppings – one after another – and have them come out of the 700-plus degree oven three minutes later, max.
Frank grew up in the village of Palermiti, in the Southern Italian province of Calabria, in a family that cooked in a wood-fired brick oven that his grandfather’s grandfather built 150 years ago. This is a guy who knows wood-fired ovens and a family that loves nothing better than to have a bunch of friends over to eat.
An hour after I called to inquire if the Corrados (former acquaintances, now friends after our bonding by fire experience) had an oven, I was at their house near Hingham Harbor, seeing how the fire was started.
 Four hours later, I went back for their first outdoor party of the season on the first winter day the mercury rose above 50 degrees. Still, it was cold after the sun went down, but you couldn’t drag this group away — pysched as they were to be back around their friends’ oven. And, to be fair, an outdoor fireplace Frank built kept everybody warm enough to stay until after 10 p.m.
“We’ve got about five house pizzas,” said Lisa, as she prepped ingredients in the kitchen wearing a chef’s jacket. Frank had just the evening before returned from visiting his parents in Palermiti, and the kitchen counter was laden with foods he’d brought home: a batch of his mother’s homemade green olives, gallons of her (homemade) olive oil, a hunk of fresh pecorino cheese.

The No. 1-selling Corrado house pizza (except nobody pays) is an adaptation of a pizza from a pizzeria in Palermiti that Frank made up. It’s simple, sounds terrible, and is, I think, the best pizza I’ve ever had. (This could be a sort of love-the-one-you’re-with effect, but I don’t think so.)
This is it: a small amount of (uncooked) tomato sauce (you want to see the white dough beneath the red sauce) and tiny bits of the following three ingredients sprinkled sparingly around the pie: canned Italian tuna in olive oil; Gorgonzola dolce cheese, and thinly sliced red onion. Oh: and a little sprinkle of olive oil all over.
The Corrado’s oven is big (43 inches across), allowing them to keep a fire burning on one side of the floor while cooking at the same time. They are thus able to keep the oven at a pizza-loving 700 degrees endlessly.
The floors of smaller ovens, however, can’t accommodate both a burning fire and cooking food. Because of this, cooks have traditionally planned a series of dishes to bake at various points as the oven’s temperature descends from its 700 degree high.
You can be sure that Frank’s great-great-great grandfather’s family conserved their wood resources by using every stage of the fire’s heat.
Edible South Shore magazine food editor and wood-fired oven enthusiast Paula Marcoux gave me a taste of that dynamic.
Marcoux, who (somehow) made her own small oven out of clay and bricks, starts with pizza after a good long fire has heated the oven to about 700 degrees and she’s swept out the ashes. As the temperature drops, she starts making bread.
“By the time my first batch of large loaves is done, my oven has usually fallen a bit too low for much more of that sort of baking, so I like to move on to other things: a cake, a chicken,” said Marcoux.
A cake sounds good. Chicken’s good, I know that. And pizza, lots of pizza, dessert pizza even, sounds very good. And so does the relative simplicity and communal nature of making pizza when entertaining.
I want a wood-fired oven.
For more on Frank Corrado’s masonry work, visit www.frankcorrado.com
Follow Joan Wilder on Twitter.